GitHub Hook 自动化部署

每次发表文章都需要 hugo 生成静态站点后,通过 Xftp 将生成的整个静态网站目录上传到云服务器上,是不是很繁琐?
解决方案:Github Hook 自动化部署。
除此之外,本篇文章还会涉及 git submodule (子模块)的运用。
本文章有操作细节。

总览

/images/建站_GitHub Hook 自动化部署/总览.png
总览

网站上传 GitHub

Hugo 网站目录

我们先来回顾下 Hugo 站点的生成。

1
2
3
4
5
G:\>::新创建一个站点
G:\>hugo new site g:\site
G:\>cd site
G:\>::通过git clone 导入网站主题
G:\site>git clone https://github.com/hugo-fixit/FixIt.git themes/FixIt

现在整个站点的模板搭建好了。让我们来看下整个站点的目录。可见 site/themes/FixIt 有一个 .github 文件,也就是说这里关联了远程 github 仓库。

 1
 2
 3
 4
 5
 6
 7
 8
 9
10
11
G:\site>tree
G:.
├─archetypes
├─content
├─data
├─layouts
├─public
├─static
└─themes
    └─FixIt
        ├─.github

上传 github 并且 clone 到云服务器

  • 注意在 site 目录下创建 .gitignore 文件设置不需要上传的文件。

     1
     2
     3
     4
     5
     6
     7
     8
     9
    10
    11
    12
    
    # Hugo default output directory
    public/
    resources/
    
    # NPM
    node_modules/
    
    ## OS Files
    # Windows
    Thumbs.db
    ehthumbs.db
    Desktop.ini
    
  • 在 github 建立仓库,并且把本地的 site 上传到 github 远程仓库。

    1
    2
    3
    4
    5
    
    G:\site>git init
    G:\site>git add .
    G:\site>git commit -m "first"
    G:\site>git remote add origin git@github.com:AyangHuang/Ayang-Blog.git
    G:\site>git push origin main
    
  • clone 到云服务器上

    1
    2
    3
    
    [ayang@VM-8-16-centos ~]$ mkdir site
    [ayang@VM-8-16-centos ~]$ cd site
    [ayang@VM-8-16-centos ~]$ git clone git@github.com:AyangHuang/Ayang-Blog.git
    

    这样就有网站的三个副本:github远程仓库、本地、云服务器。

  • 出现问题

    当你在云服务器执行 hugo 时,会发现 themes/FixIt 文件为空。(奇怪,为什么没 clone 下来)
    然后查看 github远程仓库的 themes/FixIt 文件,发现也为空。(why?因为 themes/FixIt 里面是另外一个 git 仓库。就是说一个 git 仓库嵌套另一个仓库。)

  • 解决问题

    方法一:删除 themes/FixIt 里面的 .git 文件,移除与主题远程仓库的关联,纳入自己的仓库中。缺点:如果主题更新,难以更新。

    方法二:git submodule

git submodule

面对比较复杂的项目,我们有可能会将代码根据功能拆解成不同的子模块。主项目对子模块有依赖关系,却又并不关心子模块的内部开发流程细节。也就是说子模块自己是一个 git 仓库。

  • 增加主题的远程仓库(自己的)
    本地对应两个远程仓库,一个是自己的,一个是主题作者的。这样做利于更新主题。

    1
    2
    3
    4
    5
    6
    7
    8
    9
    
    G:\site>cd themes\FixIt
    G:\site\themes\FixIt>git remote add myremote git@github.com:AyangHuang/Fixlt.git
    G:\site\themes\FixIt>git push myremote master
    G:\site\themes\FixIt>::本地对应两个远程仓库,一个是自己的,一个是主题作者的。利于更新主题。
    G:\site\themes\FixIt>git remote -v
    myremote        git@github.com:AyangHuang/Fixlt.git (fetch)
    myremote        git@github.com:AyangHuang/Fixlt.git (push)
    origin  https://github.com/hugo-fixit/FixIt.git (fetch)
    origin  https://github.com/hugo-fixit/FixIt.git (push) 
    
  • 建立子模块 git submodule add
    把 themes/FixIt 作为 site 的子模块,并推送到 github 远程仓库。

    1
    2
    3
    4
    5
    
    G:\site\themes\FixIt>cd ../../
    G:\site>git submodule add git@github.com:AyangHuang/Fixlt.git themes/FixIt
    G:\site>git add .
    G:\site>git commit -m "add submodule"
    G:\site>git push origin main
    

自动化部署

终于来到主题了。(汗)

shell 脚本

编写 shell 脚本,脚本功能:从 github 拉去最新的网站内容,然后执行 hugo 程序生成 静态站点文件。

1
2
3
4
5
6
[ayang@VM-8-16-centos ~]$ cd ~/site/Ayang-Blog
[ayang@VM-8-16-centos Ayang-Blog]$ mkdir autodeploy
[ayang@VM-8-16-centos Ayang-Blog]$ cd autodeploy/
[ayang@VM-8-16-centos autodeploy]$ touch autodeploy.log
[ayang@VM-8-16-centos autodeploy]$ vim autodeploy.sh
[ayang@VM-8-16-centos autodeploy]$ chmod +x autodeploy.sh
1
2
3
4
5
6
7
8
9
#!/bin/bash
cd /home/ayang/site/Ayang-Blog
git pull origin main
# 更新子模块
git submodule update --remote themes/FixIt 
# 执行hugo程序生成静态站点文件在 /home/ayang/site/Ayang-Blog/public
/home/ayang/go/bin/hugo
# 日志文件
echo $(date "+%Y-%m-%d %H:%M:%S") >> autodeploy/autodeploy.log

GitHub Webhook

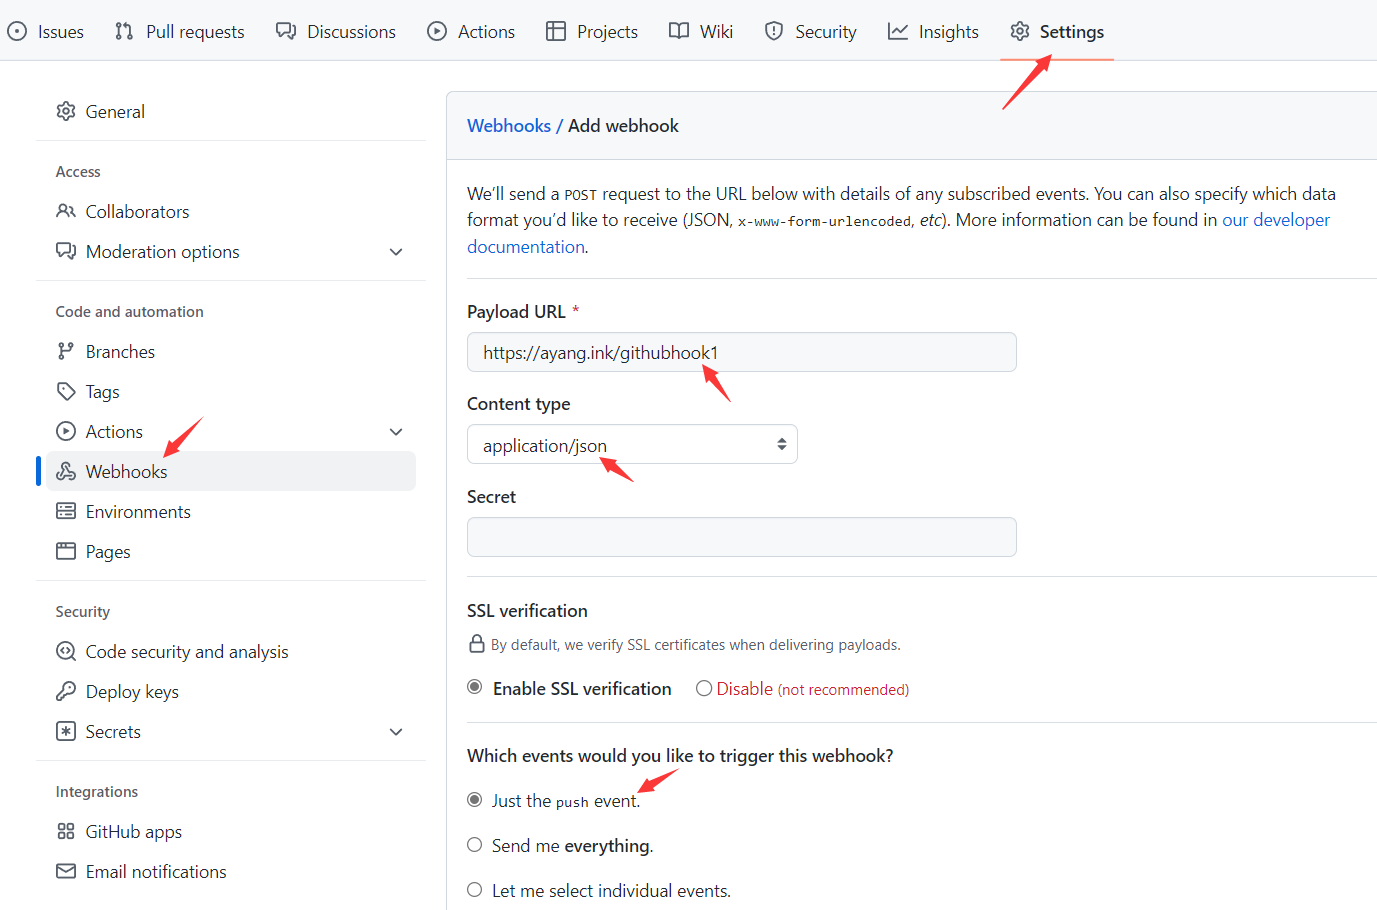
设置 Github webhook

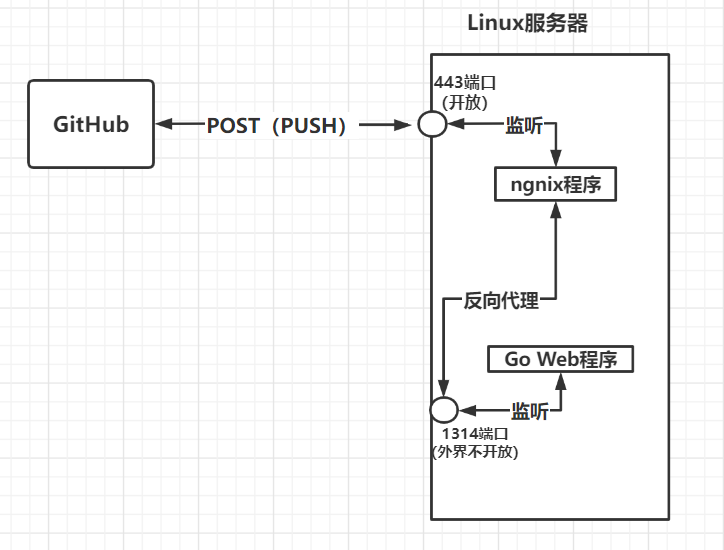
github webhook 可以在 github 仓库发生一些指定事件(例如 push )时,发送 POST 请求到指定的服务器。

设置 github 仓库发生 push (推送)事件时,发送 POST 请求到我们的服务器。
/images/建站_GitHub Hook 自动化部署/githubhook.png
Github Webhook 设置

在云服务器创建web服务器处理请求

利用 go (一行代码生成一个web服务器,还有谁?)编写web服务器接收 github 发出的 POST 请求,只要接收到请求,说明有推送(即网站有更新),执行上面编写好的 shell 脚本,拉取最新的网站内容,执行 hugo 程序重新生成静态站点。

1
[ayang@VM-8-16-centos autodeploy]$ vim goweb.go
 1
 2
 3
 4
 5
 6
 7
 8
 9
10
11
12
13
14
15
16
17
18
19
20
21
22
23
24
25
package main

import (
	"net/http"
	"os/exec"
)

func autoDeploy(w http.ResponseWriter, req *http.Request) {
	// 无加密,别搞我!求!求!
	// 不过这是内部接口,外部接口在Nginx,我不告诉你!!!
	command := "./autodeploy.sh"
	cmd := exec.Command("/bin/bash", command)
    // 执行shell脚本
	if err := cmd.Run(); err == nil {
		w.WriteHeader(200)
	} else {
		w.WriteHeader(500)
	}
}

func main() {
	http.HandleFunc("/autodeploy", autoDeploy)
    // 开启一个web服务器监听1314接口
	http.ListenAndServe(":1314", nil)
}

编译成二进制可执行文件,并让其在后台执行。

1
2
[ayang@VM-8-16-centos autodeploy]$ go build goweb.go
[ayang@VM-8-16-centos autodeploy]$ nohup goweb &

Nginx 反向代理

/images/建站_GitHub Hook 自动化部署/反向代理.png
Nginx 反向代理
 1
 2
 3
 4
 5
 6
 7
 8
 9
10
11
12
13
14
[ayang@VM-8-16-centos autodeploy]$ cd /usr/local/nginx/conf
[ayang@VM-8-16-centos conf]$ sudo vim nginx.conf
server {
        listen       443 ssl;  # 监听443端口

        location /githubhook1 {
            # 转发到 goweb 的web服务器处理
        	proxy_pass http://127.0.0.1:1314/autodeploy/;
        	proxy_redirect off;
            proxy_set_header X-Real-IP $remote_addr;
            proxy_set_header X-Forwarded-For $proxy_add_x_forwarded_for;
        }
}
[ayang@VM-8-16-centos conf]$ /usr/local/nginx/sbin/nginx -s reload

Nginx Web 服务器

 1
 2
 3
 4
 5
 6
 7
 8
 9
10
11
12
[ayang@VM-8-16-centos autodeploy]$ cd /usr/local/nginx/conf
[ayang@VM-8-16-centos conf]$ sudo vim nginx.conf
server {
        listen       443 ssl;  # 监听443端口

        location / {
            # 改这里
            root   root   /home/ayang/site/Ayang-Blog/public;
            index  index.html index.htm;
        }
}
[ayang@VM-8-16-centos conf]$ /usr/local/nginx/sbin/nginx -s reload

git push

经过以上部署后,当你在 windows 写完文章后,只需要 git push 即可提交并自动部署。

End

0%